Volumes
Volumes: Small virtual filesystems that may be attached to the Users running/active Instances.
Files/data saved to a Volume are maintained across successive attachment/detachment actions to the User’s Instances.
Volume actions (method varies per interface):
- Creation
- Attachment to an active Instance
- Detachment
- Backup
Using Volumes
Please refer to the following documentation for instructions in creating and managing volumes using our various interfaces:
- Using Jetstream2 Storage Under Exosphere
- Using Jetstream2 Storage Under Horizon
- Using Jetstream2 Storage Under the CLI
Detaching Volumes
REMINDER: Volumes can only be detached if:
- they are not in active use by a process on the instance
Try:
fuser -m /<volume>to LIST all processes using a volume- You might also try
sudo fuser -m /volumeif nothing comes up – this will check for root processes holding the volume open
- You might also try
fuser -km /<volume>to KILL all processes using a volume- If you get results with sudo above, you’ll need to do
sudo fuser -km /<volume>to kill the processes
- If you get results with sudo above, you’ll need to do
- the instance to which they are attached is active
sudo lsof /<volume>will also show you processes using the volume.
Volume Count Quota:
Projects are limited to 10 volumes. Adjustment of volume count quotas can be requested via the Jetstream2 contact form.
Project and Providers:
As with Instances, Volumes are associated/organized with Projects and with particular regional Providers (e.g. IU, TACC, UH, Cornell, ASU). (i.e. you cannot attach a Volume from one Provider to an instance on a different Provider.)
Sharing:
Generally, Volumes may be attached to one active Instance at a time.
You can’t easily share volumes in OpenStack without deploying a Shared File System service. However, the native OpenStack Manila - Filesystems-as-a-service option is available.
Volumes may also be shared using standard methods (e.g. NFS) to other active Instances within Jetstream.
Storage Quotas
There are different quotas for block storage (volumes) and shares. There will be a self-service tool for managing those quotas soon, but for now, if you need to have your Jetstream2 Storage quota adjusted between block and share storage, please contact us via the Jetstream2 contact form with the amount you wish to move between the storage types.
Backup & Exporting:
Users should regularly backup (via ssh, rsync, tar, or the like: see File Transfer) any critical data contained on Volumes as no automated backup functions are currently provided by Jetstream.
Resize a Volume
It is possible to use Horizon to enlarge an existing volume without loosing data already stored on the volume. This technique can be used even if the instance and the volume were created with Exosphere or with the Openstack Command line interface.
Refer to the Volume management section of the documentation for instructions on how to create and attach a Volume.
First we need to detach the volume from the instance. Login to Exosphere and select the Instance. From the Volumes section click on the Volume of interest to open the Volume menu and select “Detach”.
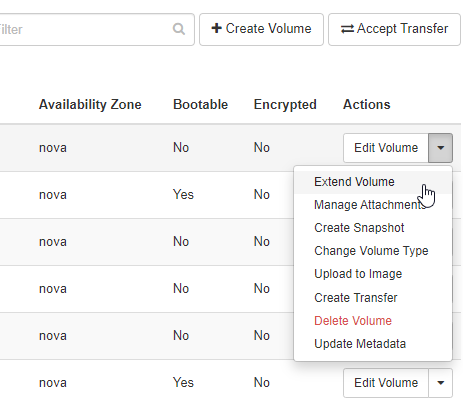
Login to Horizon, make sure to select the correct allocation, and go to the Volume management page.
From the “Actions” menu of the volume we want to resize, click on “Extend Volume” and choose a target size in GB.
Then we can open Exosphere again, select the resized volume, click on Attach and choose the target instance.
Finally we need to resize the filesystem to span the entire volume. SSH into the instance, check with df -h what device the volume is associated to (usually /dev/sdb). For example:
Filesystem                                                                                                                                                                                       Size  Used Avail Use% Mounted on
/dev/sdb 20G   24K   20G   1% /media/volume/volumetoresize
and execute the resize2fs command:
sudo resize2fs /dev/sdb
Ubuntu 22 and Rocky Linux 9 support online resizing so it is not necessary to unmount the Volume before executing the resizing.