![]() CACAO Overview ≫ CACAO CLI Installing and Logging In
CACAO Overview ≫ CACAO CLI Installing and Logging In
CACAO Command-Line Interface Login
The CACAO Command-Line Interface (CLI) allows command-line users to interact with CACAO. The CLI is a Go program that can be installed on any system.
Installation
- The CACAO CLI is a single binary that can be installed on Mac, Windows, and Linux. The most recent cli binaries can be downloaded from the CACAO packages page on Gitlab or you can download using these direct links:
- CACAO Mac (Darwin) ARM64
- CACAO Mac (Darwin) AMD64
- CACAO Windows AMD64
- CACAO Linux ARM64
- CACAO Linux AMD64
-
If necessary, rename the file to
cacao.zipand unzip the file. After unzipping, binary will be namedcacao_<os>_<architecture>e.g.cacao_darwin_arm64orcacao_linux_amd64. -
Optional, rename your binary to
cacaoand move into your path, such as/usr/local/bin.
For Linux users, this would be an example of the installation process described above:
wget -O cacao.zip  https://gitlab.com/cyverse/cacao/-/package_files/101907877/download
unzip cacao.zip
mv cacao_linux_amd64 /usr/local/bin/cacao
Login with the CACAO CLI
There are currently two approaches to logging in with the CACAO CLI. Most users should select Option 1 (Login with CACAO API Token). Option 2 (Login with ACCESS CI federated identity) is available for advanced users and is not generally recommended.
Login Option 1: Login with CACAO API Token (coming soon!)
The CACAO API Token method is the easiest method to login with the CACAO CLI, where you can simply create a CACAO API Token using the CACAO user interface and use that token with the CLI.
-
In the browser, login to CACAO at https://cacao.jetstream-cloud.org with your ACCESS CI identity.
-
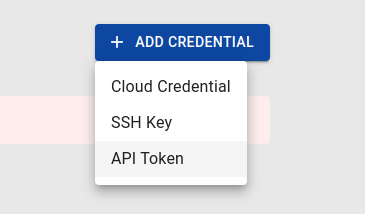
Click on the Credentials menu
-
Click on the “Add Credential” button
-
Click on the “API Token” submenu
-
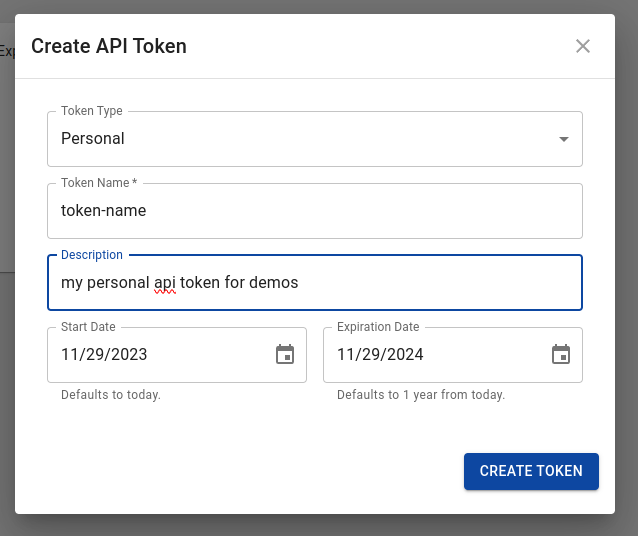
In the Create API Token dialog window, enter the following:
- Token Type: leave value as “Personal”
- Token Name: provide a unique name for your token
- Description: optional, provide a description for your token
- Start Date: optional, leave as is to start the token immediately
- Expiration Date: optional, leave as is to expire the token in 1 year or you can select a different date
-
Click on the “Create Token” button
-
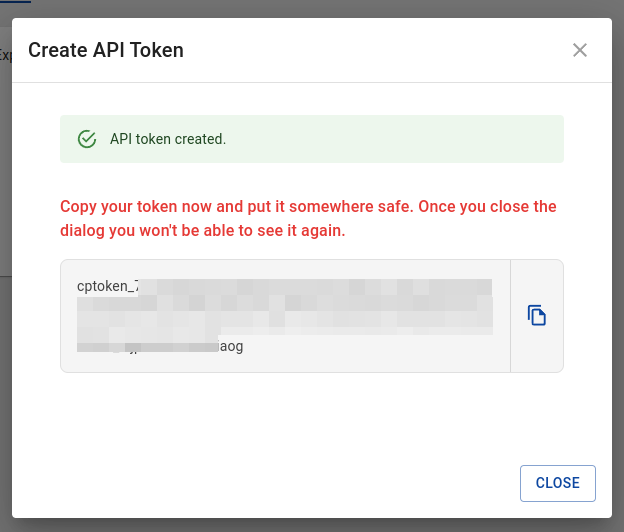
Your new token string should be displayed, but it will only be displayed once. Be sure to save it somewhere secure! Copy the token string to your clipboard (you will need this string in step 9)
-
You can click the “Close” button to close the dialog window (or keep the dialog window open until it’s no longer needed)
-
In a terminal window, you can login with the following command:
cacao login --token <token>
NOTE
<token> is the token string you copied WITHOUT the < and > characters.
- To test a successful login, you can execute a cacao command, such as:
cacao provider get
NOTE: What to do if you encounter a login issue?
Sometimes login using the command line will fail – a typo happens, a copy-n-paste of a token happens, using the wrong api url happens, etc – and you need to reset your login. To reset your login, you can use the following command:
cacao logout
Login Option 2: Login with ACCESS CI federated identity
This method integrates with ACCESS CI and requires a few steps.
cacao login --browser
NOTE: What to do if you encounter a login issue?
Sometimes login using the command line will fail – a typo happens, a copy-n-paste of a token happens, using the wrong api url happens, etc – and you need to reset your login. To reset your login, you can use the following command:
cacao logout
Please provide address of Cacao API.
Format Should be: http://<hostname>:<port>        or    <hostname>:<port>
(Developers: this should match the value of API_DOMAIN in install/config.yaml followed by "/api", e.g. ca.cyverse.local/api)
Cacao API address (http://ca.cyverse.local/api): https://cacao.jetstream-cloud.org/api
- Enter the CACAO API url:
https://cacao.jetstream-cloud.org/api
Cacao API address (http://ca.cyverse.local/api): https://cacao.jetstream-cloud.org/api
Please go to this URL in the browser: https://cacao.jetstream-cloud.org/api/user/login

After login, you should get a JSON response, the auth token could be the value of following properties:
- "IDToken" or "id_token" if keycloak
- "access_token" if other auth provider

Enter the auth token you get from browser:
WARNING!
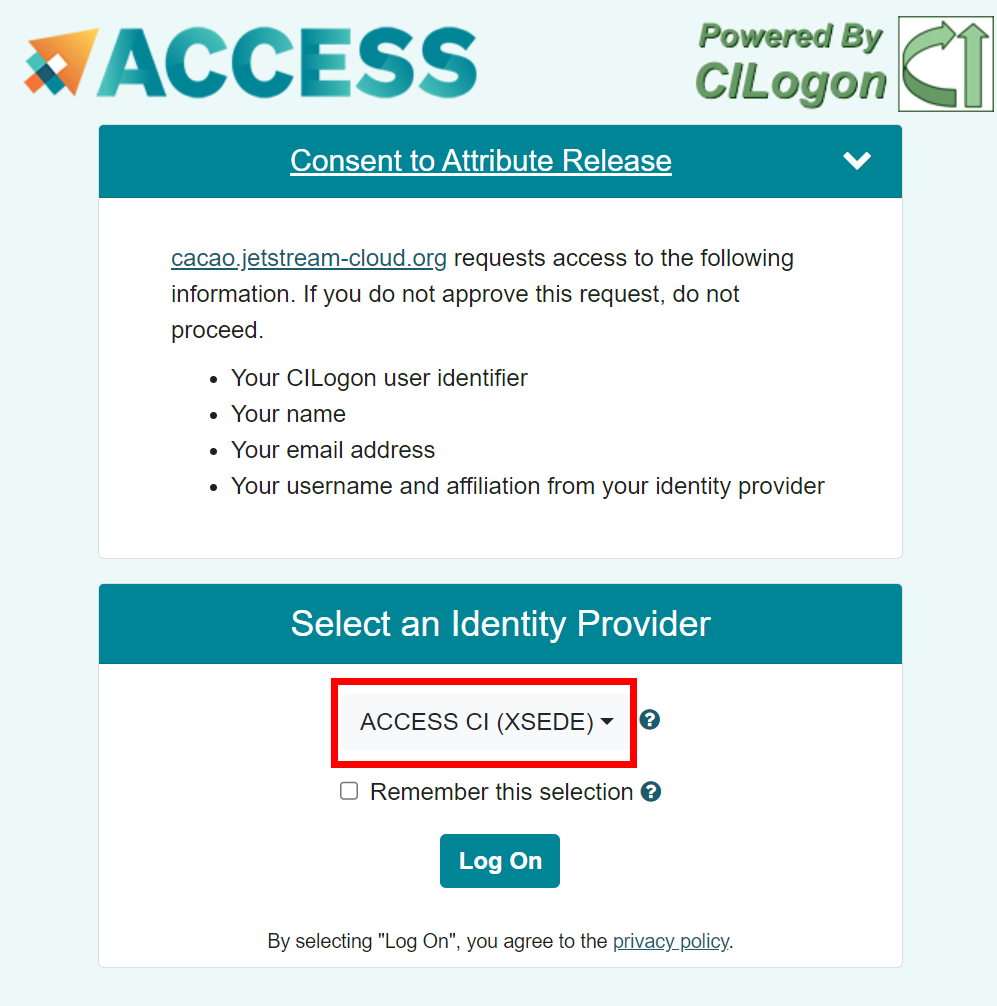
It is recommended that you use the “ACCESS CI (XSEDE)” identity provider when you login, especially if you encounter any issues logging in. After creating your ACCESS CI identity, you should be able to login with other linked identities.
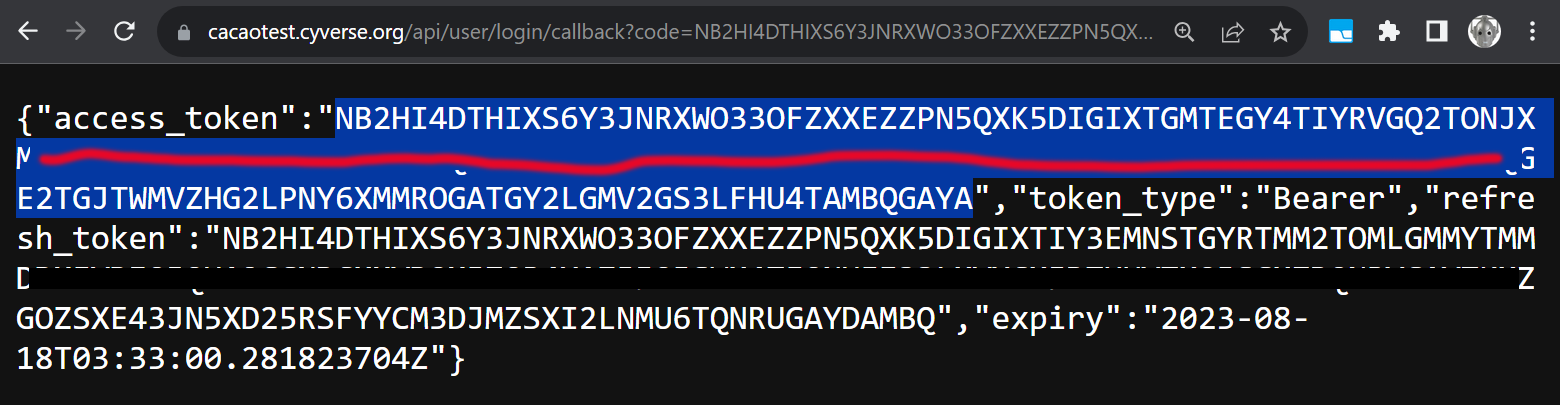
- You will need to grab the the “access_token” that is returned from the browser and paste the following text into the terminal: “Bearer” followed by a space and then the access token. For example, if the access_token were GOOSE, the the string you enter will be:
Bearer GOOSE
Tip
- Do not include the quotes around the token.
Beareris case sensitive.- There is one space between Bearer and the token.
Below are screenshots of what you might expect to see from Chrome and Firefox.
Chrome:
Firefox:

After pasting the “Bearer ” + access_token, you should return to the shell prompt.
Enter the auth token you get from browser: Bearer NB2HI4DTHIXASDFUINASDKLFASDHFKASDFJASDFA23FNYTHI4Z5GE3DSMRTGMYDGNJWHE3TIJTWMVZHG2LPNY6XMMROGATGY2LGMV2GS3LFHU4TAMBQGAYA
$
- To test a successful login, you can execute a cacao command, such as:
cacao provider get