Deploying Magic Castle (virtual slurm cluster)
Magic Castle, developed by the Digital Research Alliance of Canada (formerly Compute Canada), is a terraform template to deploy a virtual slurm cluster. This template has been adapted to launch easily in CACAO.
Note
This deployment of Magic Castle will create at least two primary accounts, one local account with sudo privileges and a slurm account, and zero or more guest accounts. The local system account is your typical cacao username while the slurm account is your username with a “_slurm” appended. For example, if your username is myuser, then your slurm account will be myuser_slurm.
Pre-requisites
You will need to setup the following before you deploy any cloud resource using CACAO:
- Jetstream cloud credentials (aka application credential)
- your public ssh key
Instructions on installing your first Jetstream cloud credential and adding ssh key in CACAO can be found here.
Magic Castle requires several OpenStack resources, which may impact your quota limits. Here is a summary on minimum resources:
- 1 floating IP
- 3 security groups
- 1 network
- 1 subnet
- 1 router
- 3 volumes
- 3 instances
- 8 VCPUs
- 7 neutron ports
- 12 GB of RAM
- 8 security rules
- 80 GB of volume storage
See this page for more information on these limits. You may need to request a quota increase from Jetstream2 staff if you do not have enough quota.
Instructions
The steps below will guide you through the process of deploying a Magic Castle (virtual slurm cluster)
- Go to Deployments menu in CACAO
- If you have more than one ACCESS allocation, you should select the ACCESS project in the left drop down menu.
- Select “Add Deployment” from the top right corner.
- Click on launch Compute Canada Magic Castle from the list of available templates. You may need to scroll down to find it.
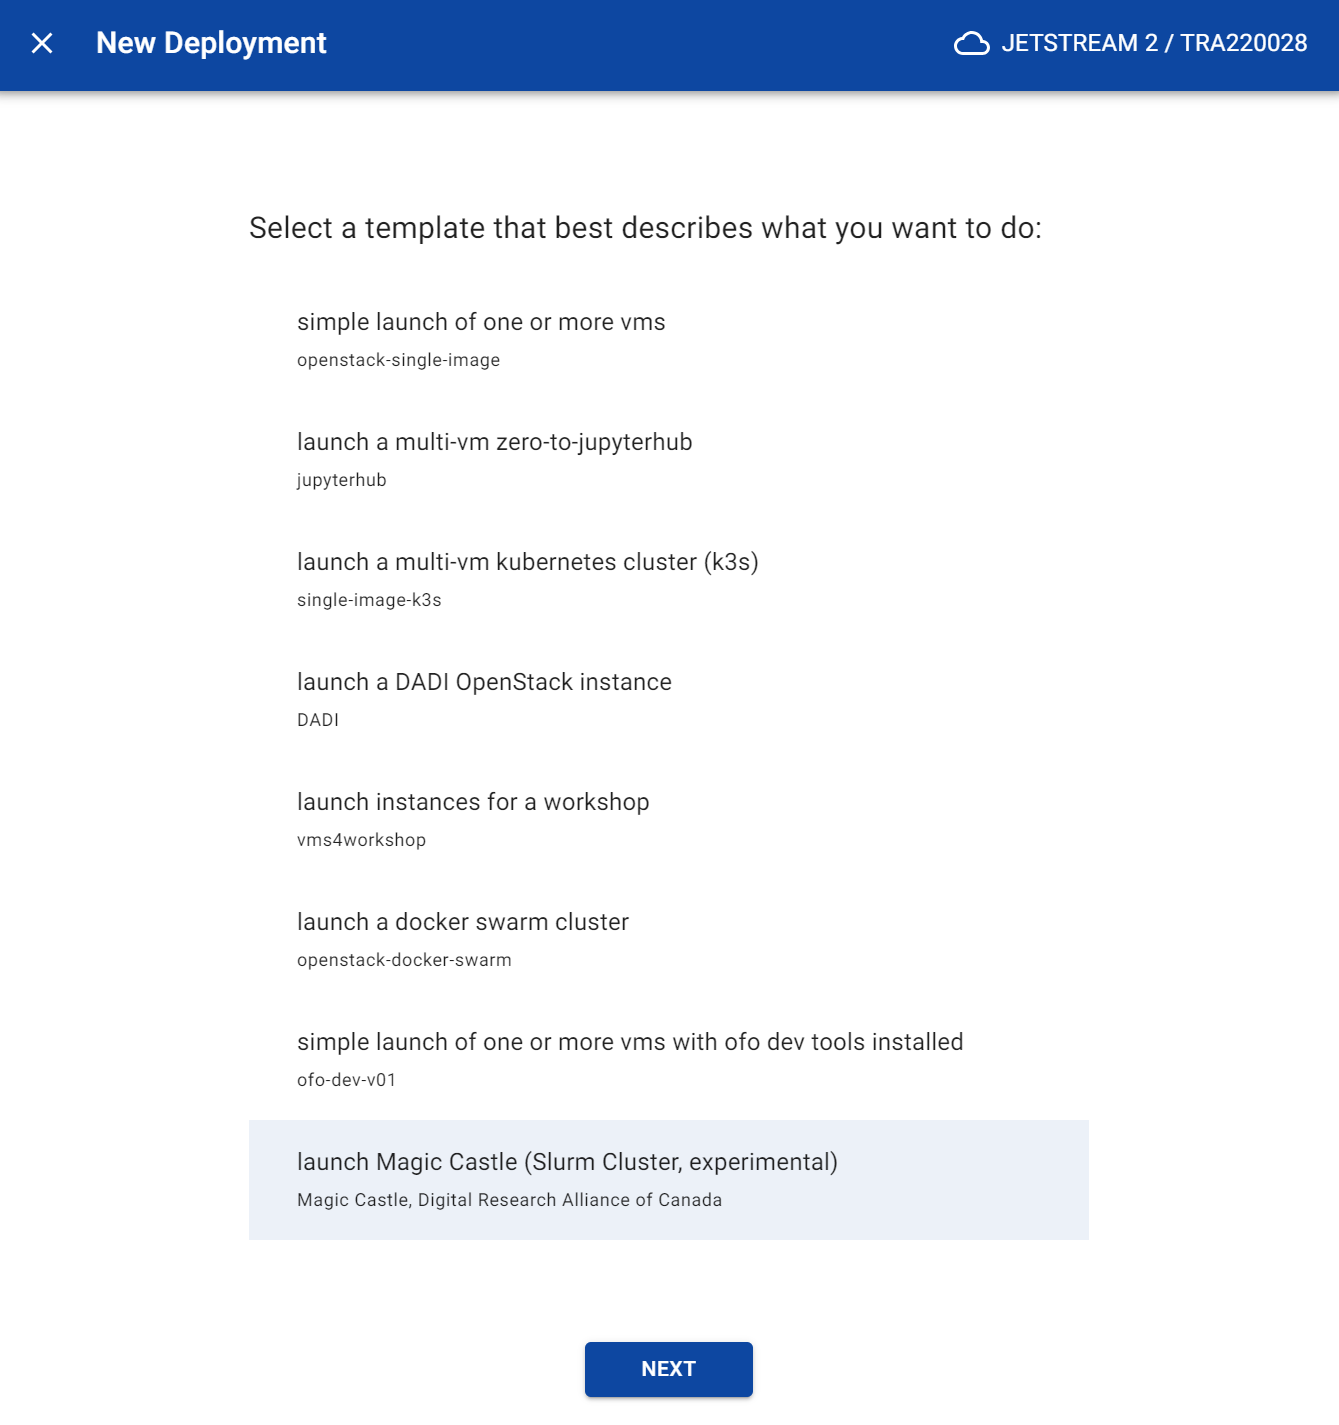
- Click the Next button
-
In the dialog:
- Choose your Region
- Give a Cluster Name
- Select a Boot Image
Note
You must select Rocky Linux 8/9 image
- Management Nodes: select the number and size of your management node(s)
- Login Nodes: select the number and size of your login node(s)
- Worker Nodes: select the number and size of your compute nodes
- Size of the NSF Home Volume: enter the size of the home volume in GB
- Size of the NSF Project Volume: enter the size of the project volume in GB
- Size of the NSF Scratch Volume: enter the size of the scratch volume in GB
- Enter the number of guest users. Setting this to 0 will disable guest users.
Note
Guest users will be named
user1,user2, etc- Enter a guest user shared password or leave blank to generate a random password
Note
All guest users will use the same password. The usernames and password will be repeated in the
accounts.txtfile (see below)
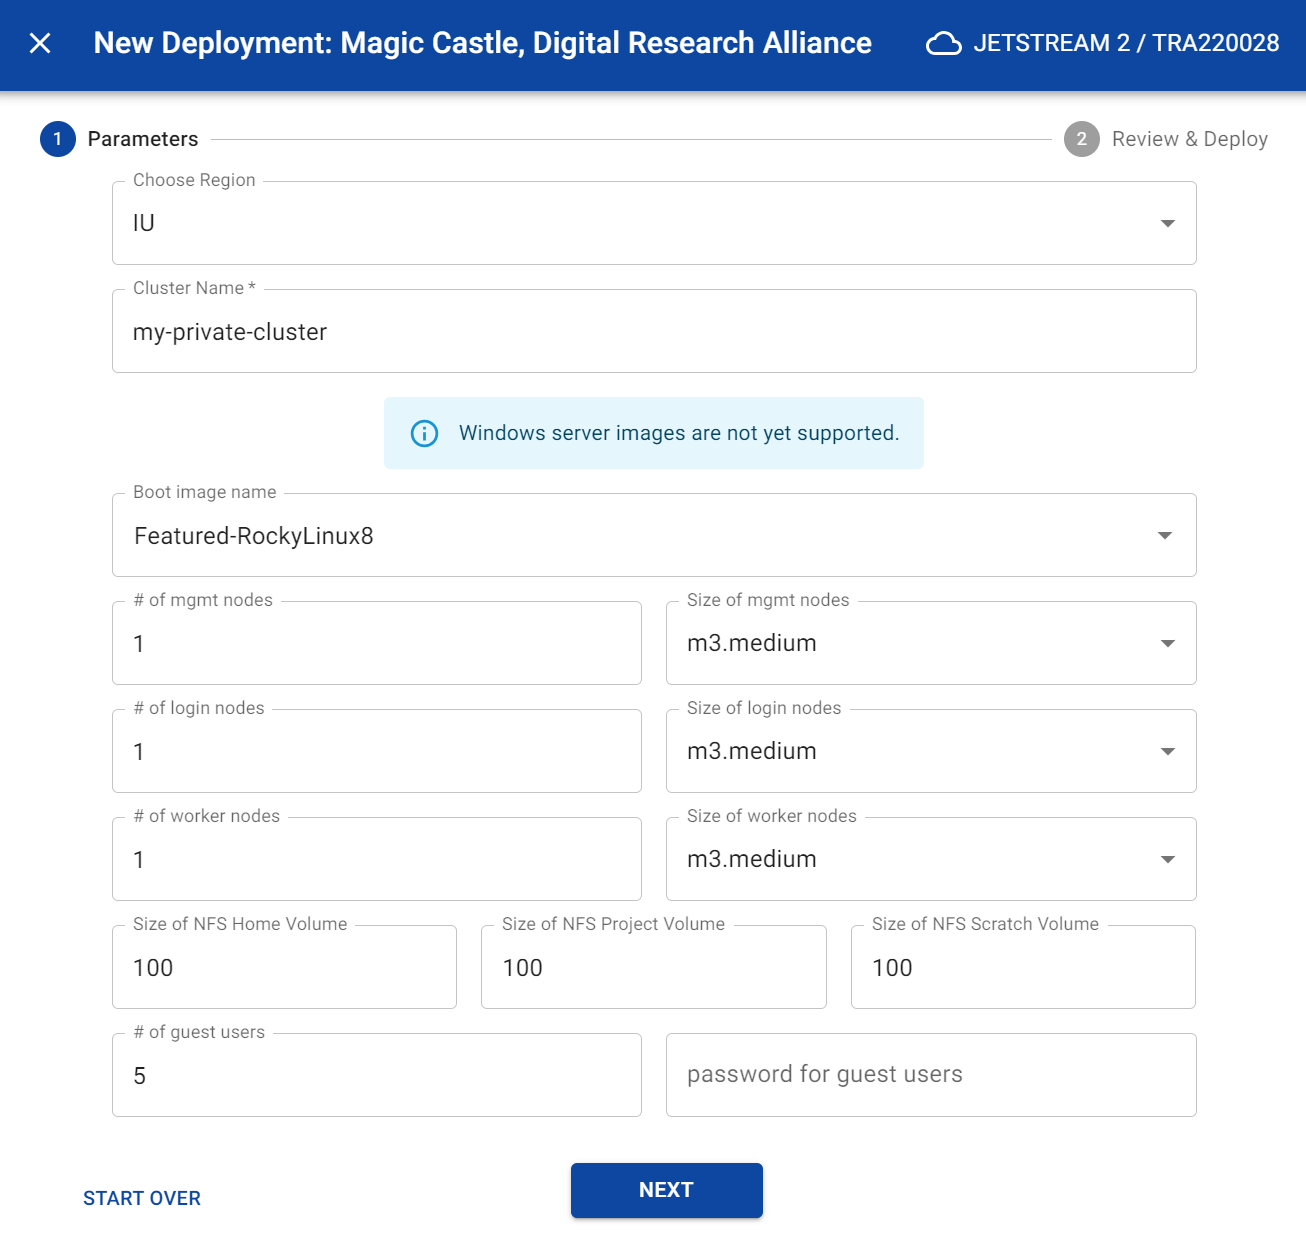
- Click the Next button
- After reviewing the parameters, click the “Submit” button
- Get a cup of coffee and wait for the deployment to be “Active”. You can monitor the progress of the deployment in the “Deployments” menu.
Accessing your Magic Castle Cluster as the “Sudo” user
When your Magic Castle deployment is “Active”, you have two options to access the cluster as an “sudo” user, the account with elevated privileges.
Option 1: Web Shell
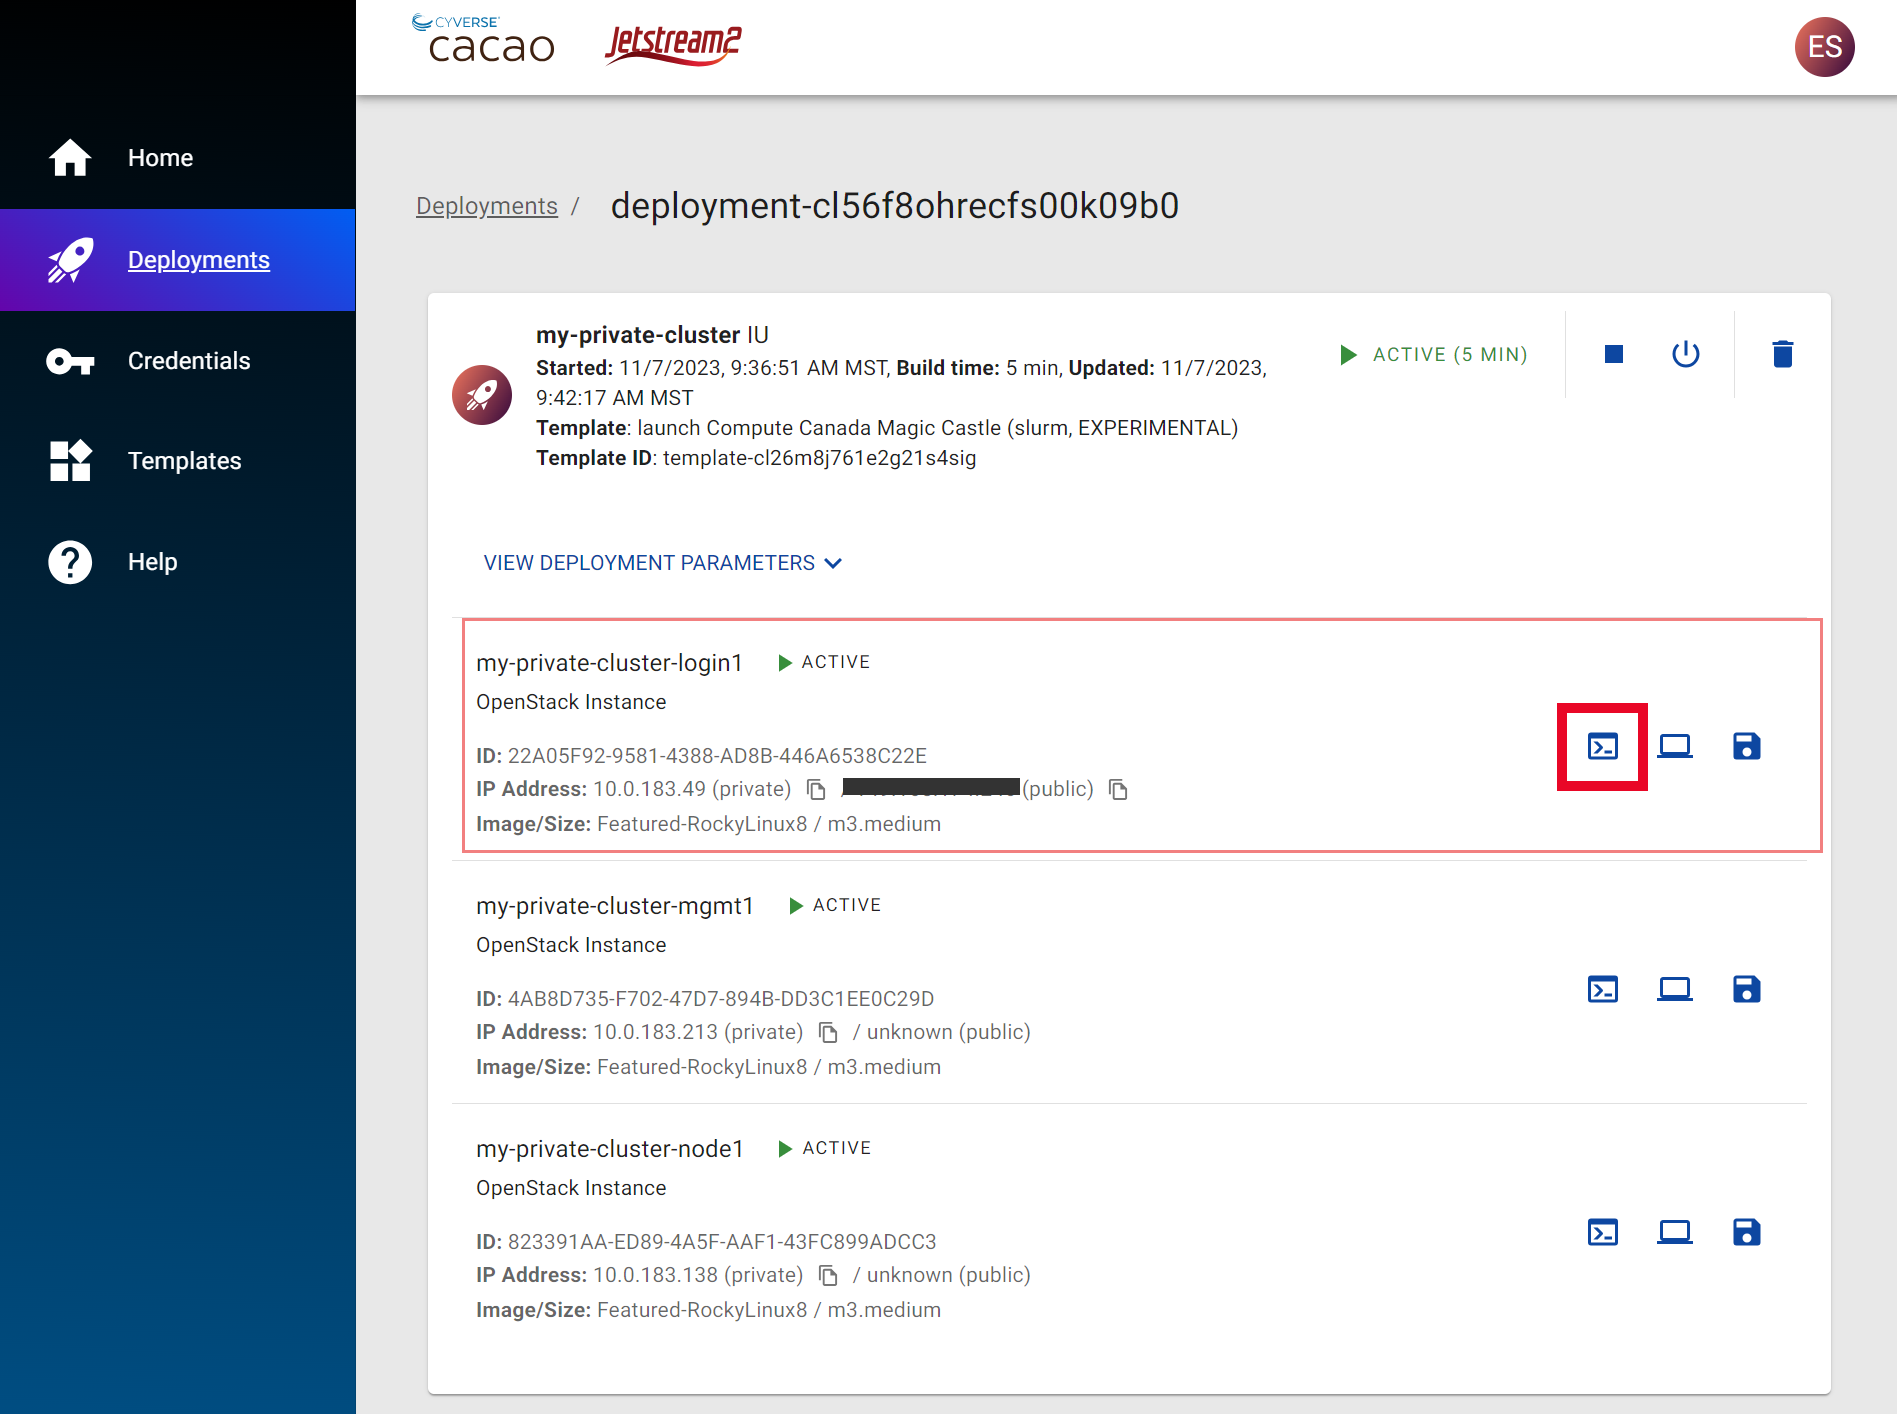
- In the Deployments list, click on your deployment
- Click on the “Web Shell” button for the login node (see image)
Option 2: Using an SSH Client
- In the Deployments list, click on your deployment
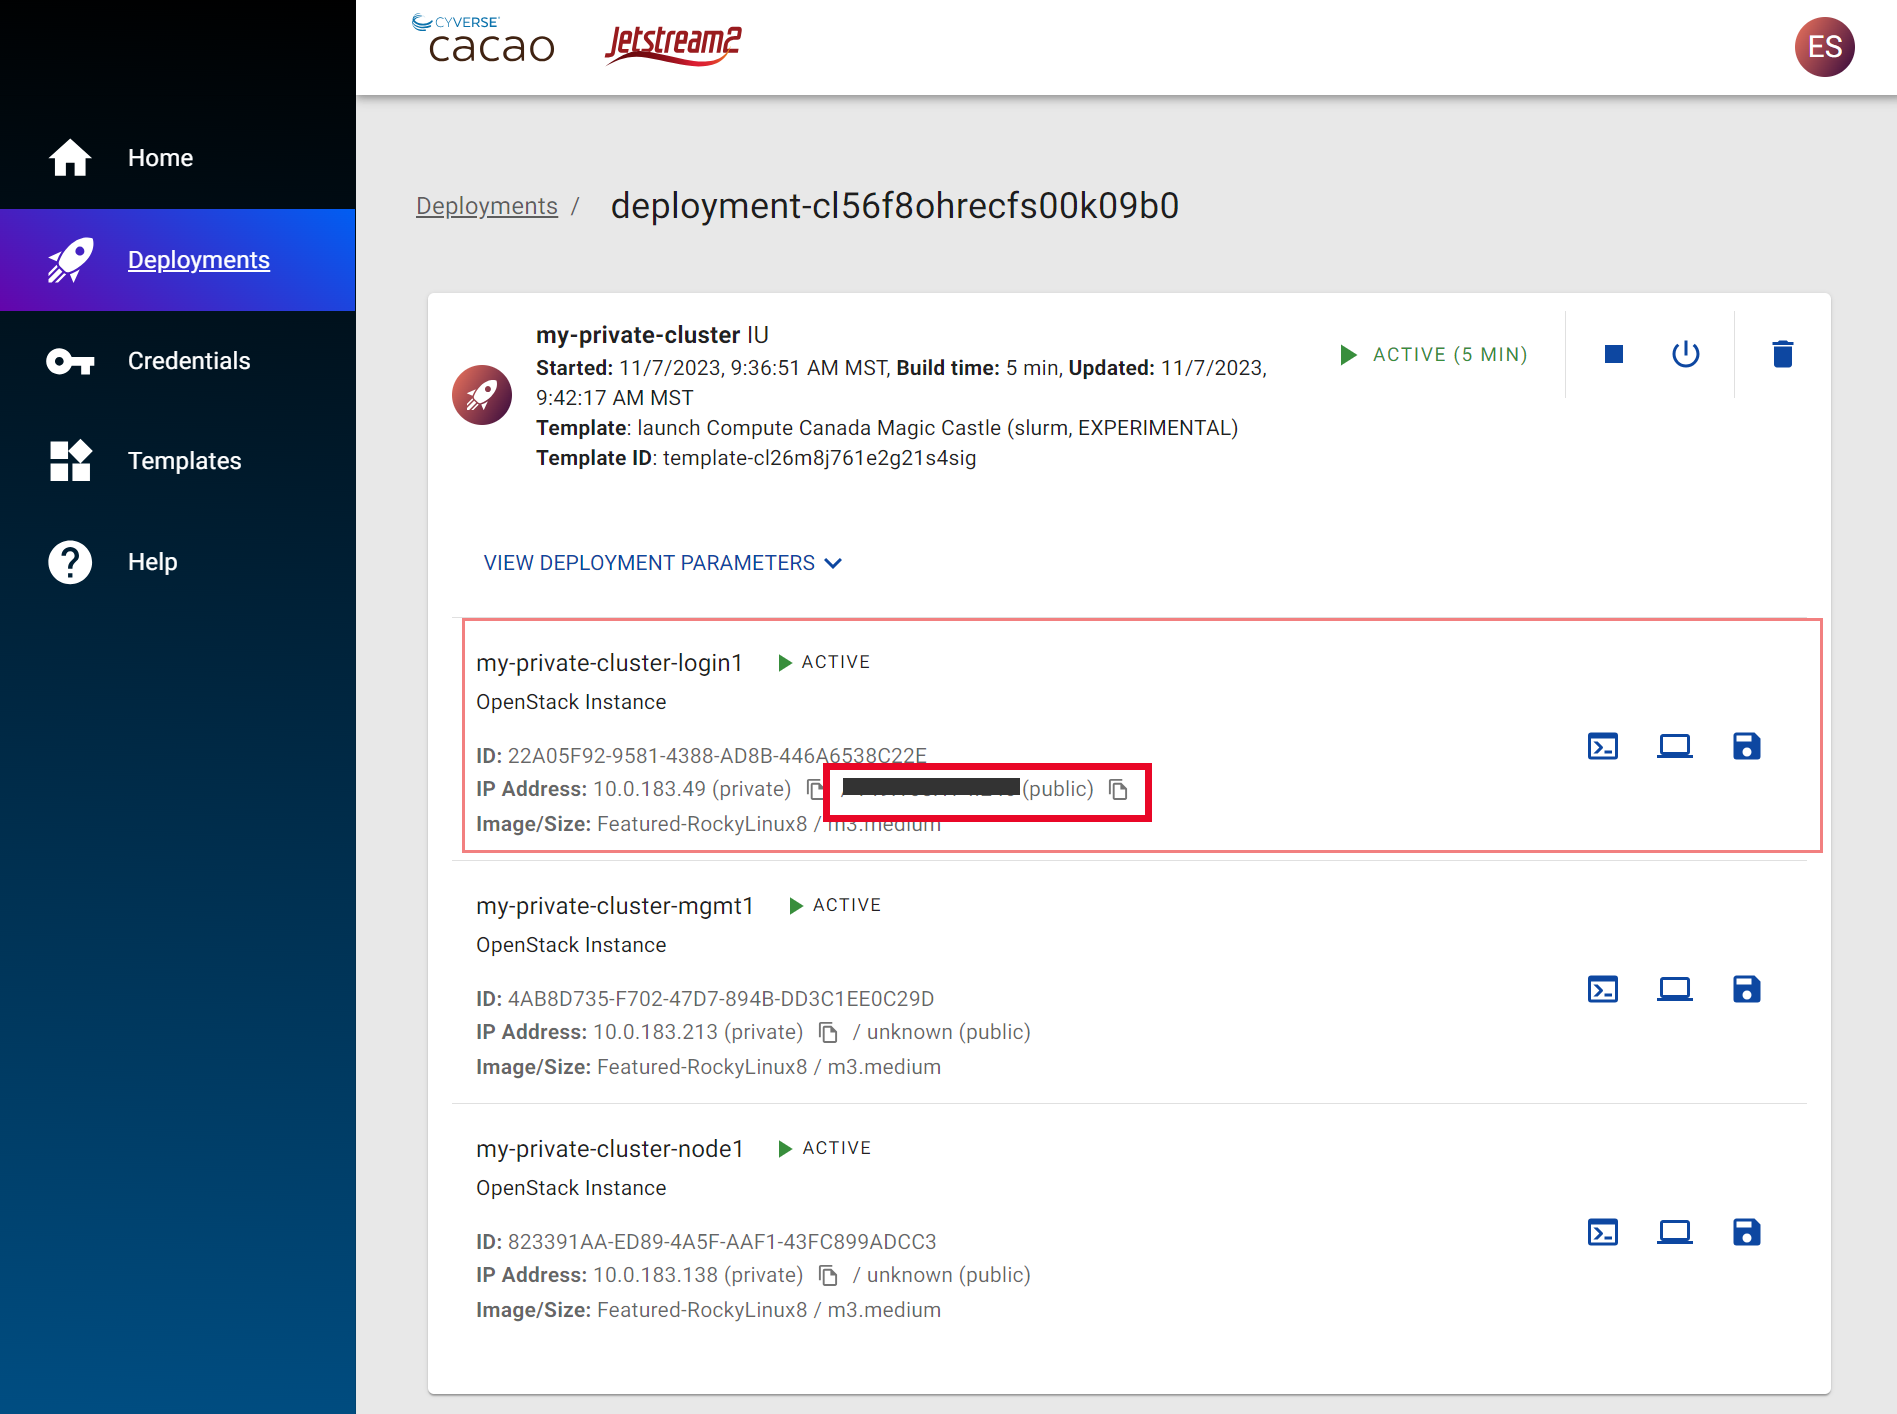
- Copy the public ip address for the login node (see image)
- Using an external ssh client with access to your private key that is associated with a public key imported into CACAO, goto:
<username>@<public-ip-address>. For example, if your access ci identity (and cacao username) iswildcat@access-ci.organd the public ip is1.2.3.4, then your ssh login to the login node will bewildcat@1.2.3.4.
Verifying that your Magic Castle Cluster is ready to use
- When you web shell or ssh into your Magic Castle cluster login node, you should see a message similar to screenshot below.
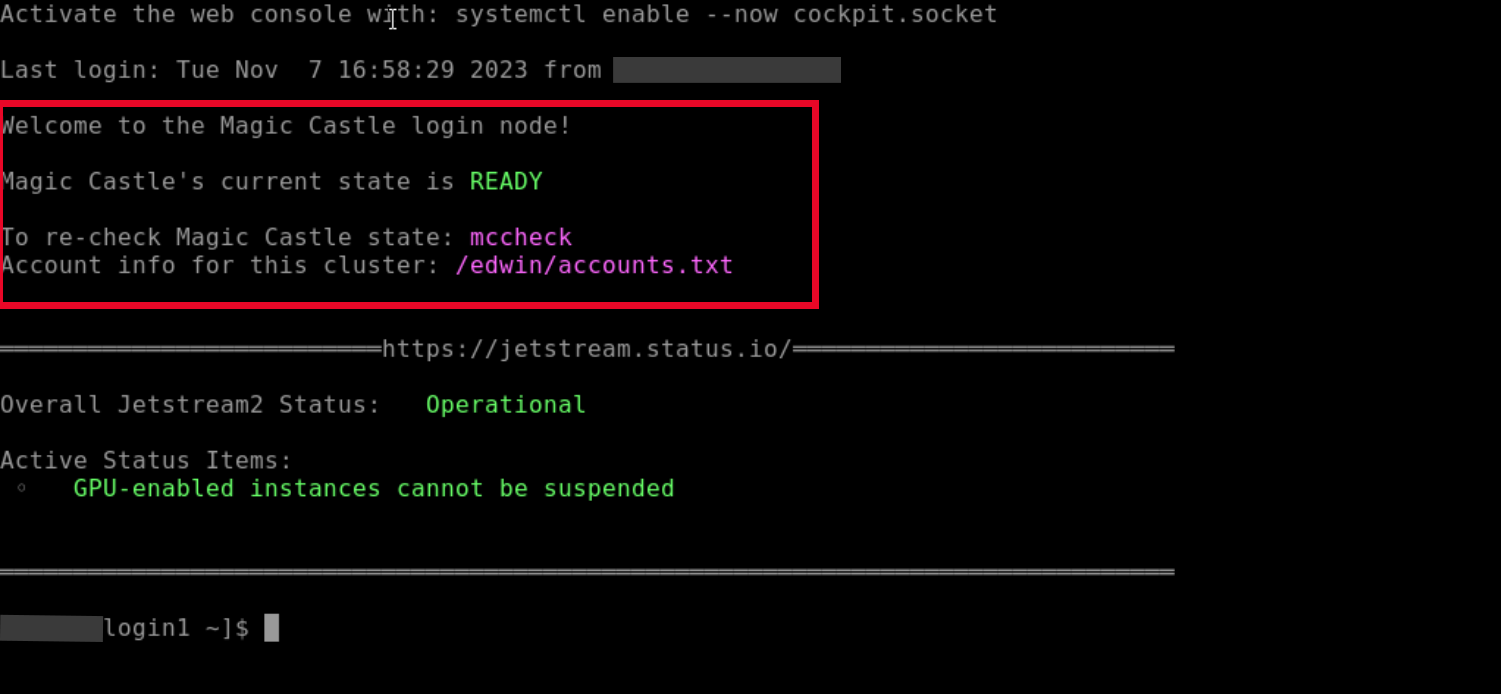
- You should see the following information:
- The current state of your Magic Castle cluster. The state should be “Ready” when ready, and “Not Ready” when not.
- The cli command to re-check the Magic Castle Cluster:
mccheck. - The path to the
accounts.txtfile that contains both the number of guest users and the shared guest user password.
Accessing your Magic Castle Cluster as your slurm user
Your slurm user, which is created with your username with a _slurm suffix, is the account that you can use to submit jobs to the slurm cluster. You can access the slurm user account using ssh client or sudo’ing to the slurm user as the “sudo” user. For example:
sudo su - yourusername_slurm
Giving access to your Guest Users
Guest users can access the Magic Castle cluster using an ssh client. The guest user accounts are autogenerated (e.g. user1, user2, etc) and will use the same password. The password is stored in the accounts.txt file in the home directory of the “sudo” user. You can optionally disable guest users by setting the number of guest users to 0.
Software stacks
Magic Castle comes with a variety of software stacks pre-installed using the module command. This template uses Digital Research Alliance’s default software stack, the alliance option. Use the command module avail to see the current list on the compute node.
The following list shows the options for software stacks for use when you deploy Magic Castle:
alliance: The default module stack from Digital Research Alliance (see https://docs.alliancecan.ca/wiki/Available_software)essi: The European Environment for Scientific Software (see https://www.eessi.io/docs/)js2: The Jetstream2 stack (see Jetstream2 Software Collection)
Defining a custom project volume snapshot
Another advanced feature for this template is to use an openstack volume snapshot as a template for your project directory (mounted to /project). There are a number of steps to prepare a volume snapshot for use within Magic Castle.
- Create a volume (save the volume uuid); examples below are using openstack cli but you can use horizon dashboard as well.
openstack volume create --size 100 my-volume - Attach volume to an instance (save the device name for later use)
openstack server add volume <instance uuid> <volume uuid of my-volume> - SSH into the instance, format the prep the volume
# the following commands will setup LVM pvcreate /dev/sdb vgcreate project_vg /dev/sdb lvcreate -l+100%VG -n project project_vg # this command will create an xfs filesystem mkfs.xfs -L project /dev/project_vg/project # mount the volume and create directories mkdir /mnt/mydata mount /dev/project_vg/project /mnt/mydata # make directories here # setup permissions for world rwx (e.g. chmod 777 /mnt/mydata/data) umount /mnt/mydata - Detach the volume from the instance
openstack server remove volume <instance uuid> <volume uuid of my-volume> - Create a snapshot of the volume (save the volume snapshot id)
openstack volume snapshot create --volume <volume uuid of my-volume> my-volume-snapshot - You can now use the volume snapshot id in the Magic Castle deployment, in the Advanced settings.
Keep in mind that the volume snapshot will be use to create a copy for a new project volume, which will be mounted at /project. If you need to update volume snapshot data, you will need to mount the original volume, update the data in that volume, and create a new snapshot (with a new snapshot id).
Another thing to keep in mind is that the original volume or a volume snapshot cannot be deleted if it is in use by any instance.
Lastly, you can specify a larger project volume size than the original volume snapshot, but you will need to perform a few steps to resize the filesystem and the logical volume. Here are the steps that must be performed on the “management” node manually:
pvresize /dev/sdclvresize -l +100%FREE /dev/project_vg/projectxfs_growfs /dev/project_vg/project