Deploying JupyterHub
Deploying Multi-VM Zero-to-JupyterHub (jupyterhub)
JupyterHub allows multiple users to access Jupyter notebooks and computational environments through a web browser, making it particularly useful for collaborative or classroom settings. The Multi-VM Zero-to-JupyterHub (Z2JH) template in CACAO simplifies the deployment of JupyterHub on Kubernetes based on Zero-to-Jupyterhub, with the option to use a single VM for small deployments or multiple VMs for larger deployments on Jetstream2.
Pre-requisites
You will need to setup the following before you deploy any cloud resource using CACAO:
- Jetstream cloud credentials (aka application credential)
- your public ssh key
Instructions on installing your first Jetstream cloud credential and adding ssh key in CACAO can be found here.
Instructions
The steps below will guide you through the process of deploying a Zero-to-JupyterHub
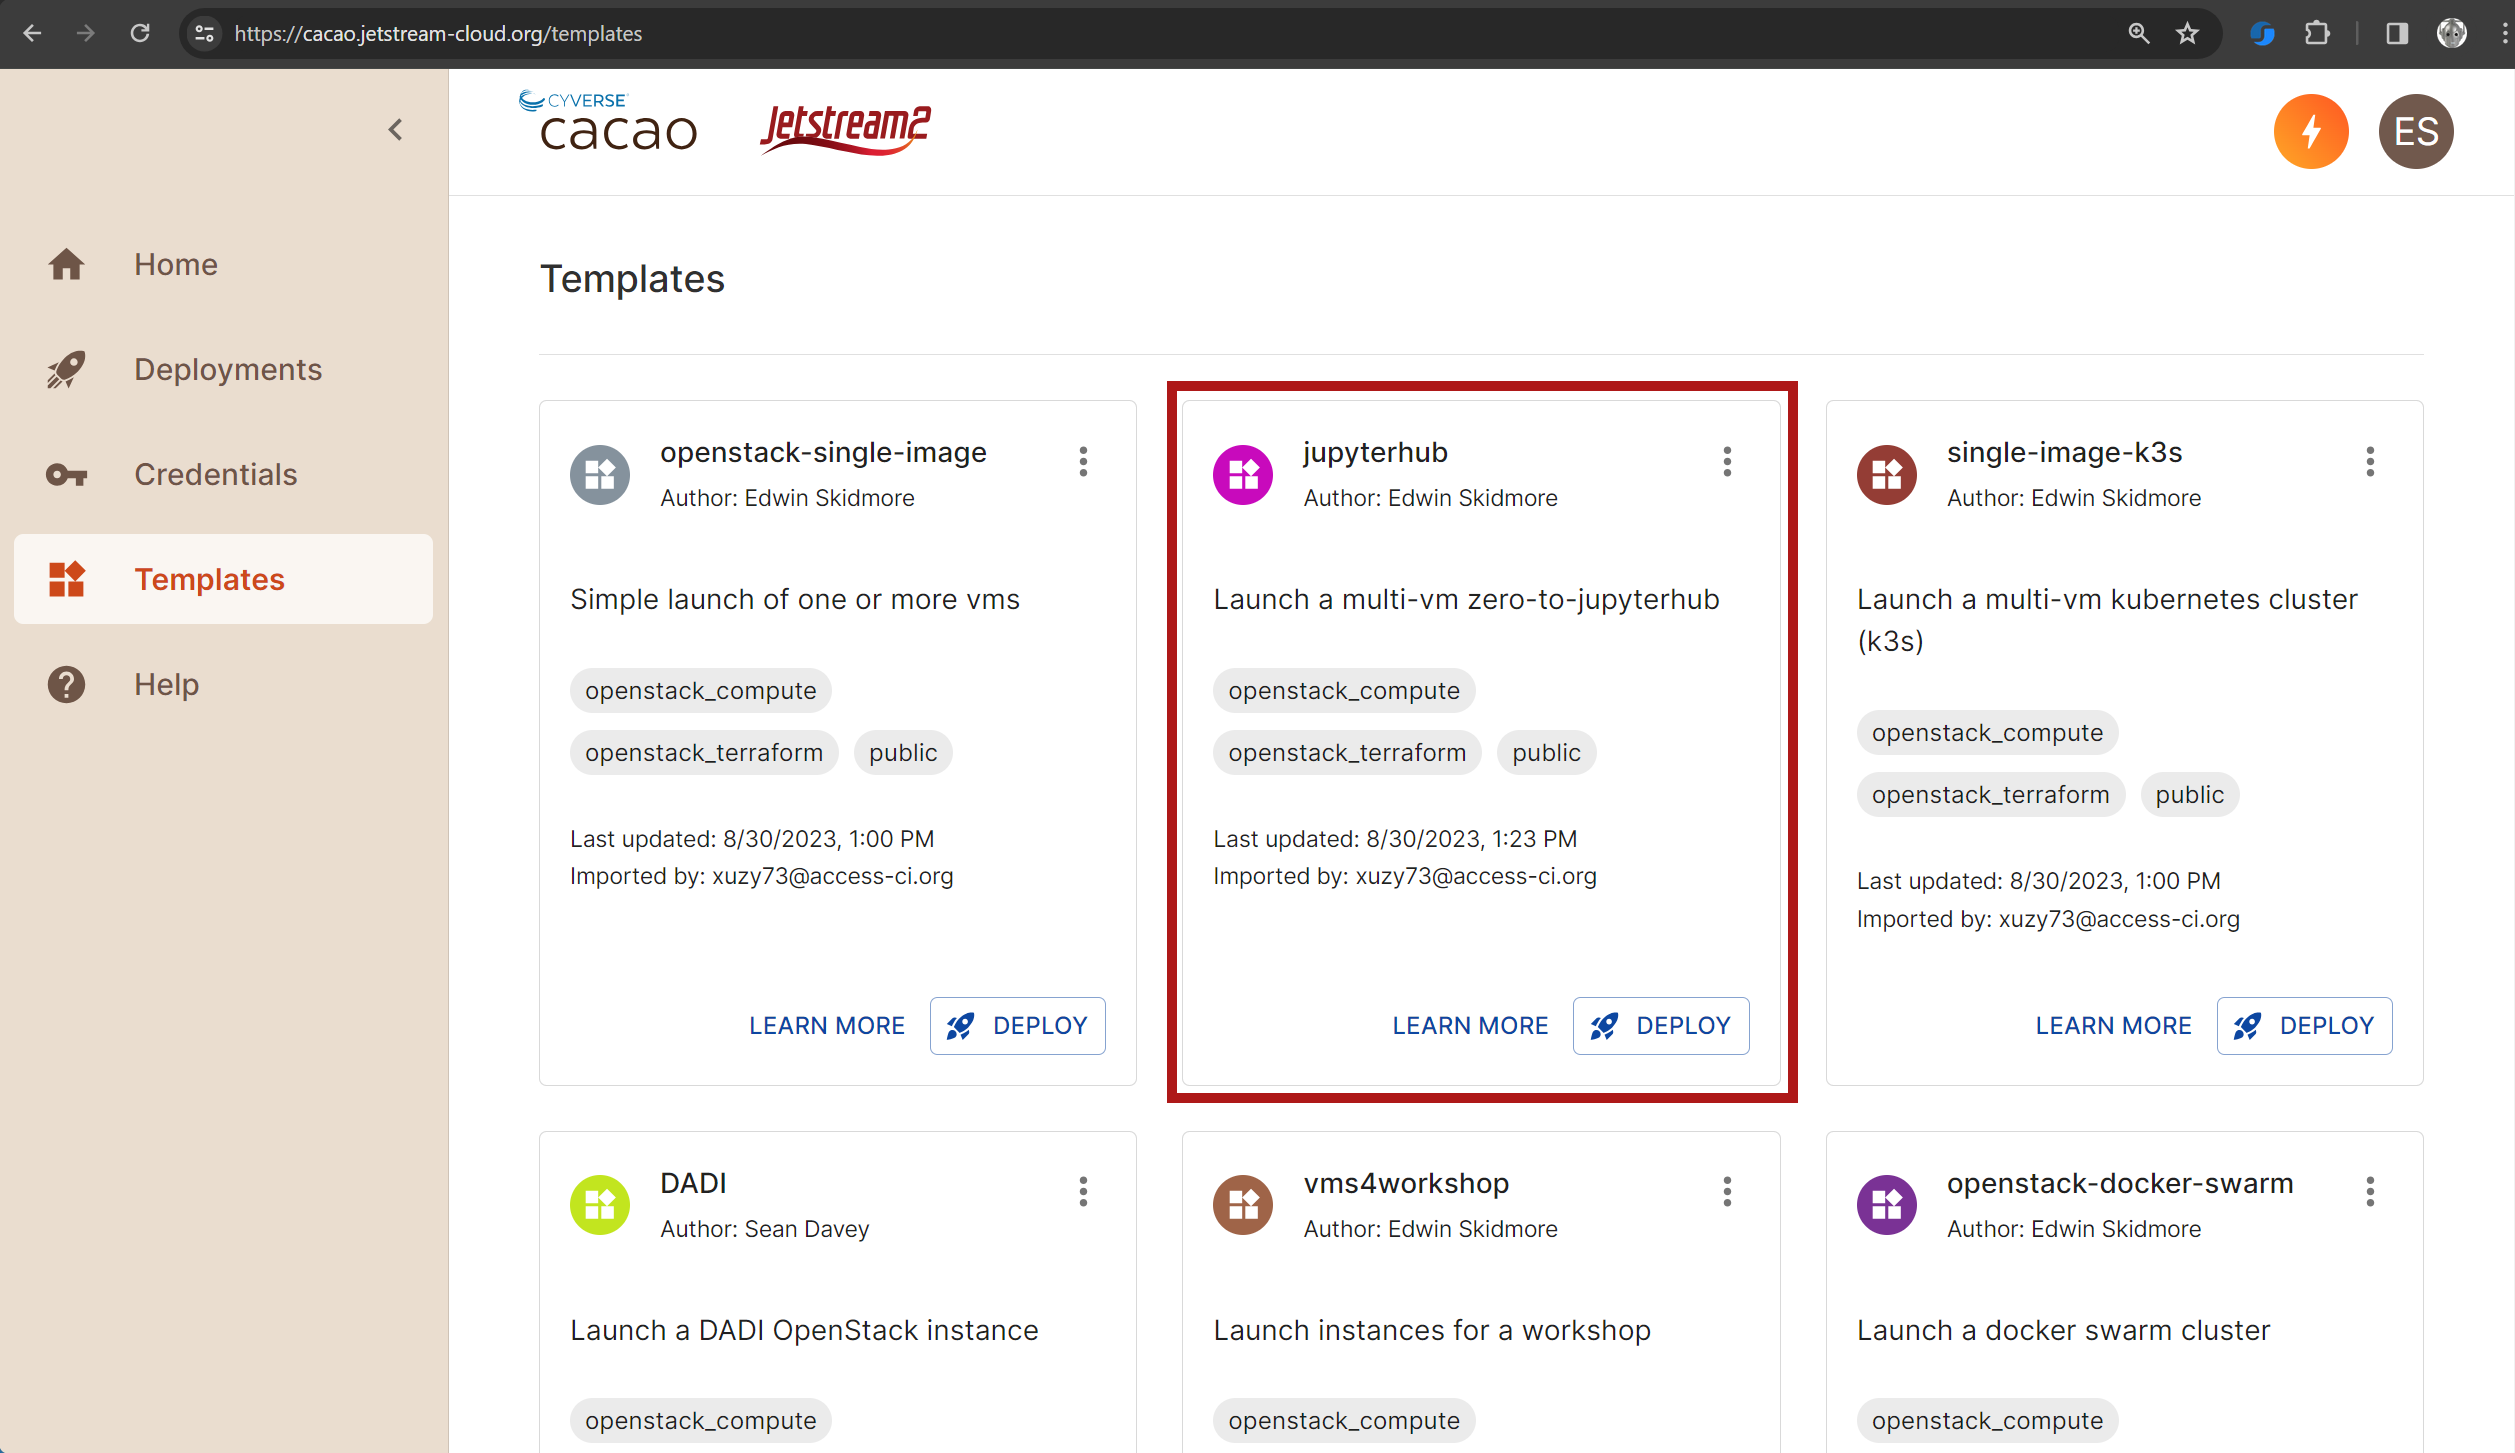
- Go to Templates menu in CACAO
- Find the template titled “jupyterhub” with a description “launch a multi-vm Zero-to-JupyterHub (jupyterhub)”.
- Click on the “Deploy” button
- Select “Jetstream2” as the cloud provider and select the project, if you have more than one.
- Click “Next”
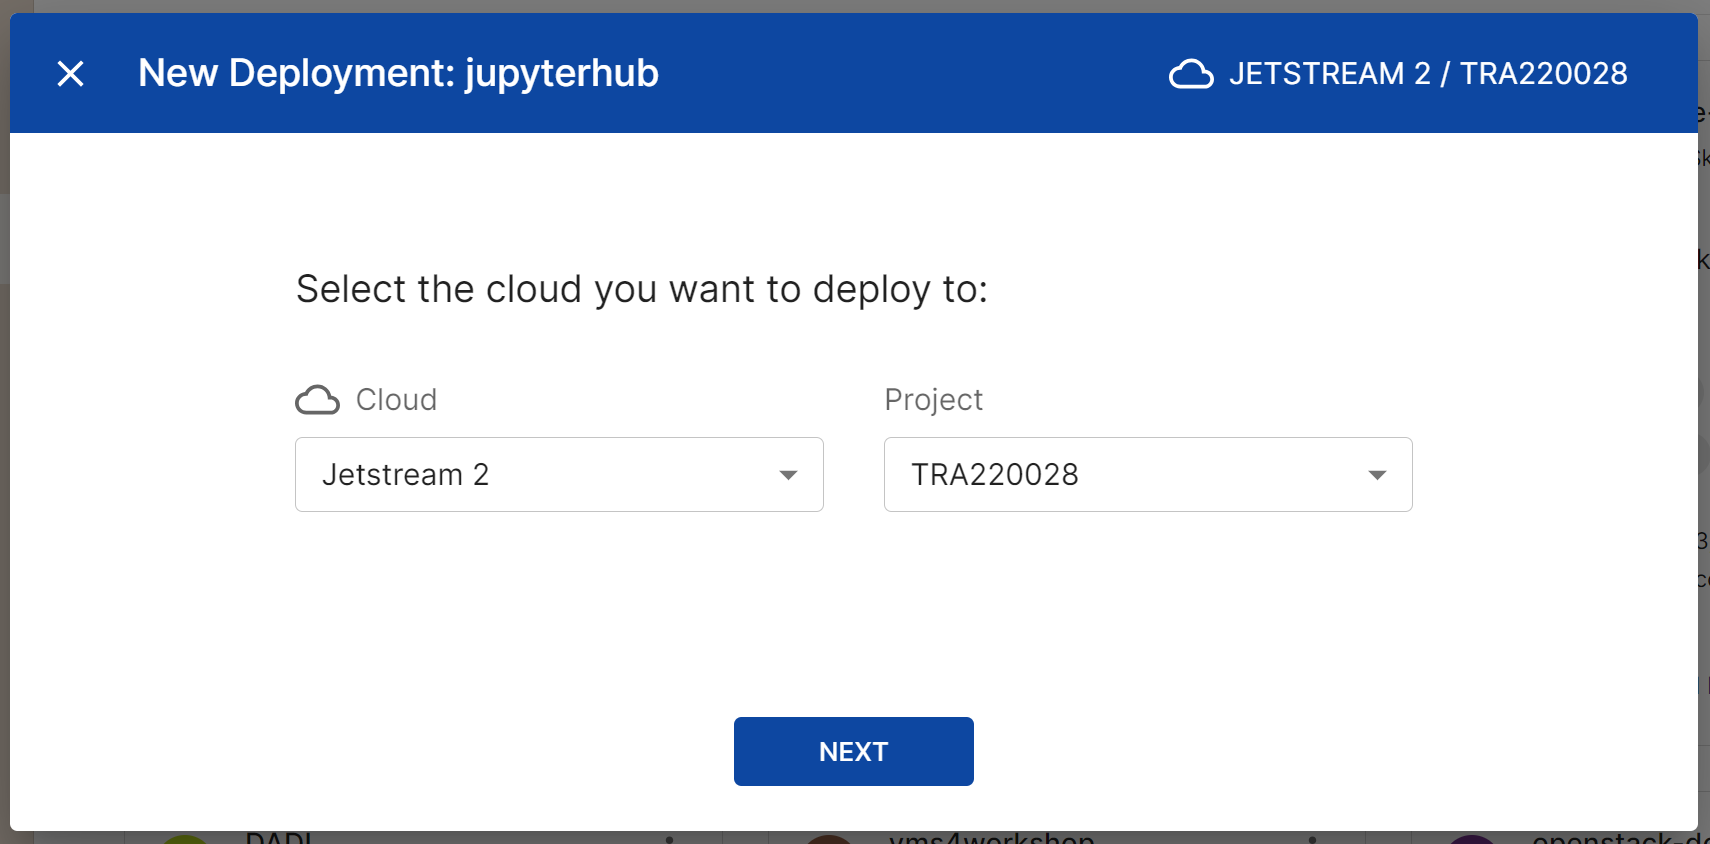
- Select the region (the default is “IU”)
- Click “Next”
-
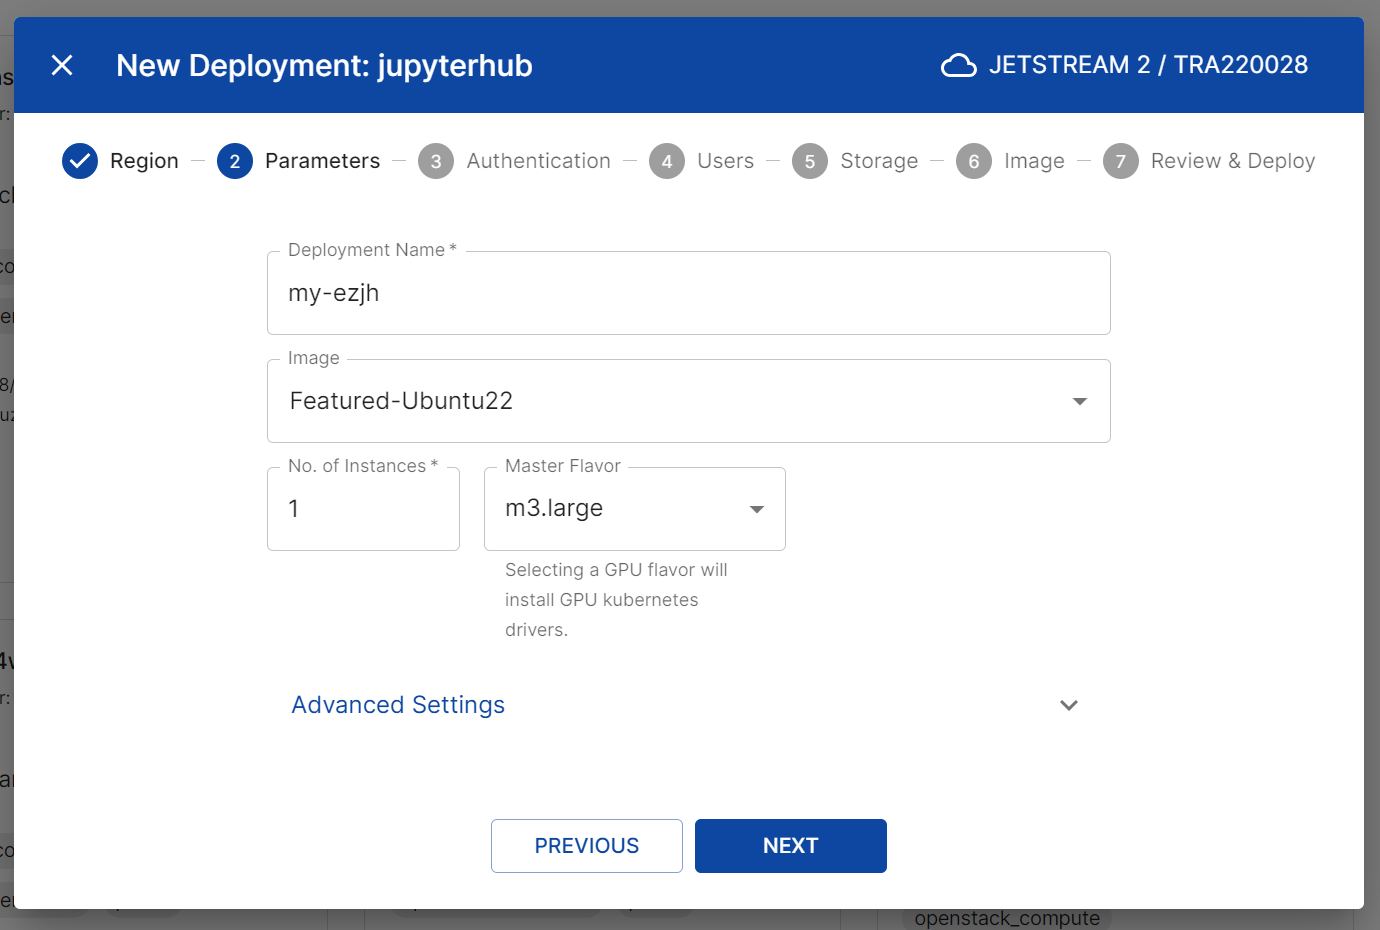
The screen will now show essential parameters to configure. You can change the default values if needed.
- Deployment Name: Give a name to your deployment, unique if possible
- Image: Select the image you want to use with your deployment; most users should select “Featured-Ubuntu22”
- Number of Instances: Select the number and size of your management node(s)
- Master Flavor: Select the size of your master node
- Worker Flavor: This option is only available of Number of Instances > 1. Select the size of your worker node(s). By default, jupyter notebooks will run on both master and worker nodes. You can restrict jupyter notebooks to run only on worker nodes in the “Advanced Settings”.
Number of Instances
A Jupyterhub consists of a master node and 0 or more worker nodes. If the Number of Instances is 1, then you will only be able to select a Master Flavor. If the Number of Instances is greater than 1, you will need be able to select a Master Flavor and a Worker Flavor
Master Flavor and Worker Flavor
Depending on how many students or users you expect to use the JupyterHub, you should consider the right balance of the number of instances and the size of the instances. By default, the jupyterhub is configured with a cpu guarantee of 0.5 and RAM guarantee of 1G.
GPU Flavors
If you select a GPU flavor, then GPU drivers will be installed in the kubernetes cluster for you.
-
(optional) There are several Advanced Settings, which can all be left as default. However, you can change the following:
- (Advanced Setting) Hostname & IP Address: if you reserved a floating ip and assigned a dedicated hostname to that floating ip, you can enter the values here.
Note
By default, you can access your jupyterhub by using the ip address of the master node. See the “Accessing your JupyterHub” section below for more information.
- (Advanced Setting) Disable notebooks on master node: If enabled, this will disable the jupyter notebooks on the master node. This is useful if you deploy multiple worker nodes for a relatively large number of users and data-intensive notebooks.

- (Advanced Setting) Enable GPU Sharing and Number of Timeslices: By default if gpu flavors are selected, then each user will be assigned their own GPU worker node. If you enable this option, then users will share or split time on the gpu(s), using “timeslicing”. This essentially allows You to configure how many users will share each gpu node.
Warning
You will need to ensure that there are enough gpu nodes or timeslices for the number of users you expect to use the JupyterHub. If using timeslices, then you can multiply the (Number of Timeslices) x (the number of gpu worker nodes) to get the total number of users that can use the JupyterHub. For example, if you have 2 gpu worker nodes and 4 timeslices, then you can have 8 users using the JupyterHub at the same time.

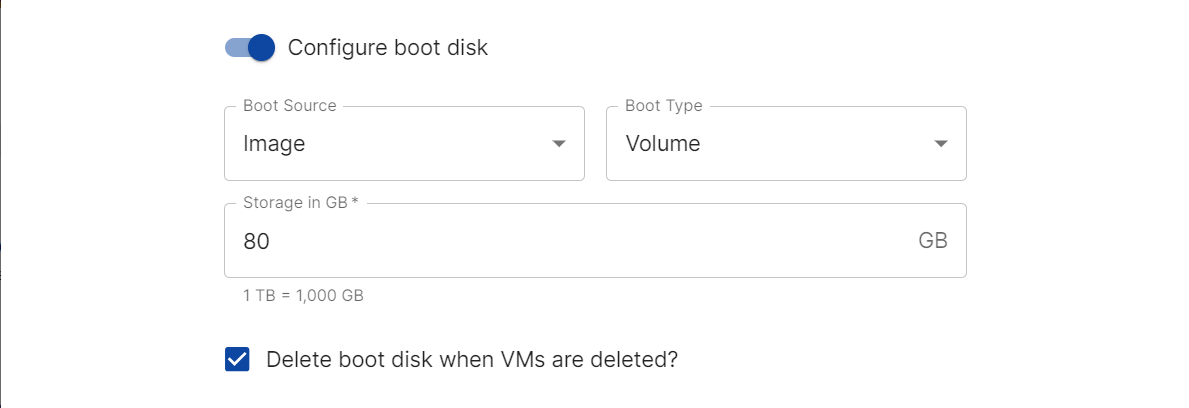
- (Advanced Setting) Configure Boot Disk: This advanced setting allows you to define the size of the boot disk for the master and worker nodes. By default, disk size for each VM is the default for the flavor. You can increase the size of the boot disk if you expect to have large datasets or many users. To set, configure the following:
- Boot Source: leave as “Image”
- Boot Type: change to “Volume” if you want to increase all volumes
- Storage in GB: enter the size of the boot disk in GB for all VMs
- Delete boot disk when VMs are deleted: leave as “Yes” to delete the boot disk when the VM is deleted is generally recommended. Otherwise, you will need to manually delete the boot disk in the “Volumes” menu in Horizon.
Warning
Using boot disks will count against your volume (count) and volume storage quotas. To estimate the impact against your volume storage quota, use (number of VMs) x (storage in gb). You can check your volume quota and volume size quotas in the “Quotas” menu in Horizon.
-
Click “Next”
- The Authentication screen will allow you to configure per user authentication.
- Authentication Type: Currently, “Dummy Auth” and “GitHub Auth” are supported. Other types of authenication can be added by contacting cacao staff. For the purposes of this tutorial, we will use “Dummy Auth”.
- Dummy Password: “Dummy Auth” sets a common password for each user you create. You can set the password here.

- Click “Next”
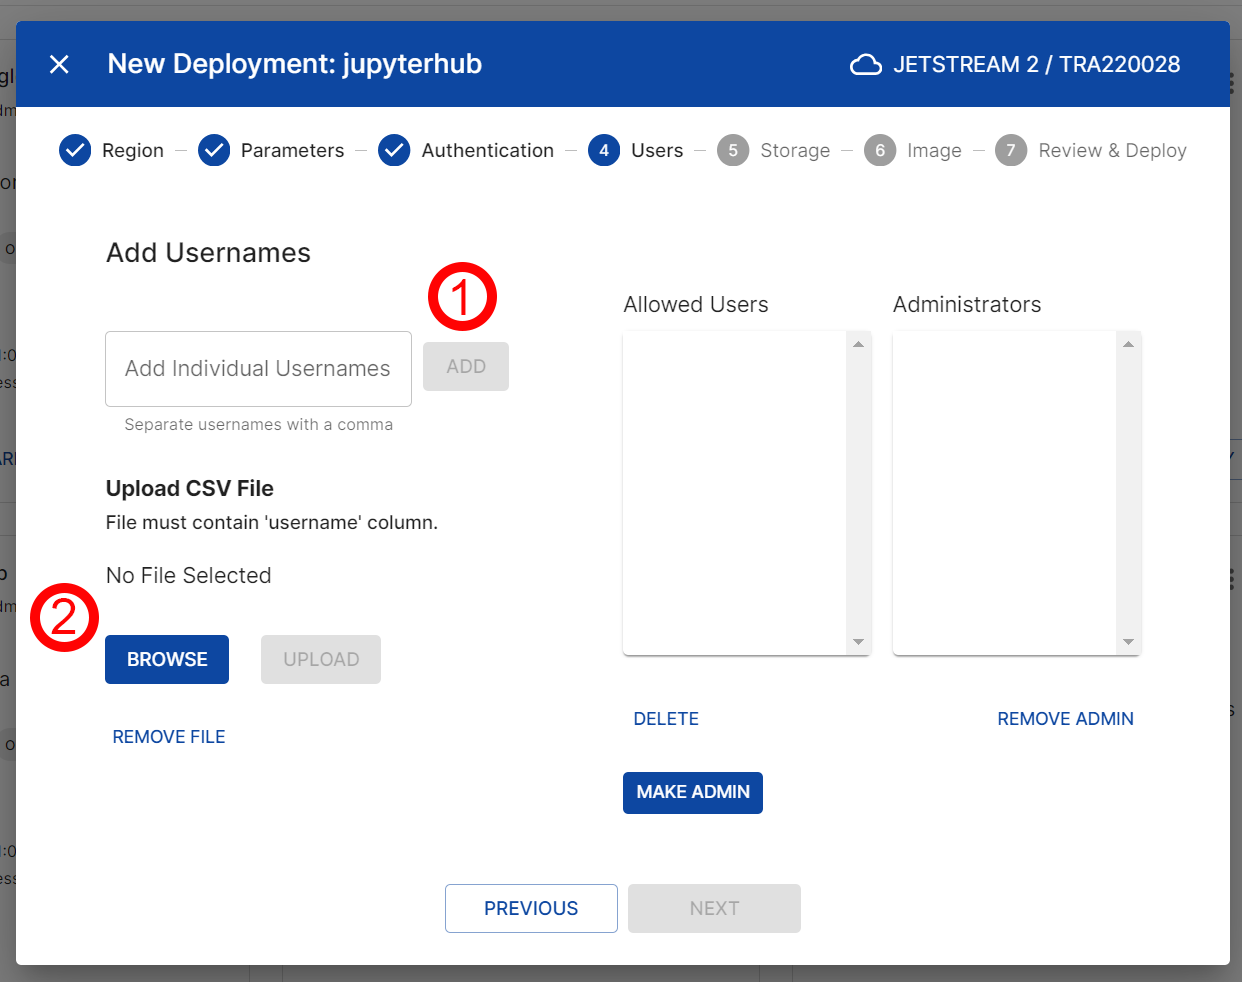
- The Users screen will allow you to manually add users or import users using a csv file into the JupyterHub. You can also add users after the deployment is complete using the JupyterHub interface. The two options:
- Option 1: Add users manually, one at a time
- Enter the username
- Click “Add” Button
- Option 2: Add users with a CSV file
- Click “Browse” button to select a csv file that must have one column with the header “username” and the usernames in the column.
- Click “Upload” button
- You should then select at least one admin user. Admin users have the ability to manage the JupyterHub and other users.
- Select one or more users in the “Allowed Users”
- Click “Make Admin” button to make the user(s) an admin(s)
- (optional) If you wish to remove a user, select the user and click the “Delete” button.
- Option 1: Add users manually, one at a time
- Click “Next”
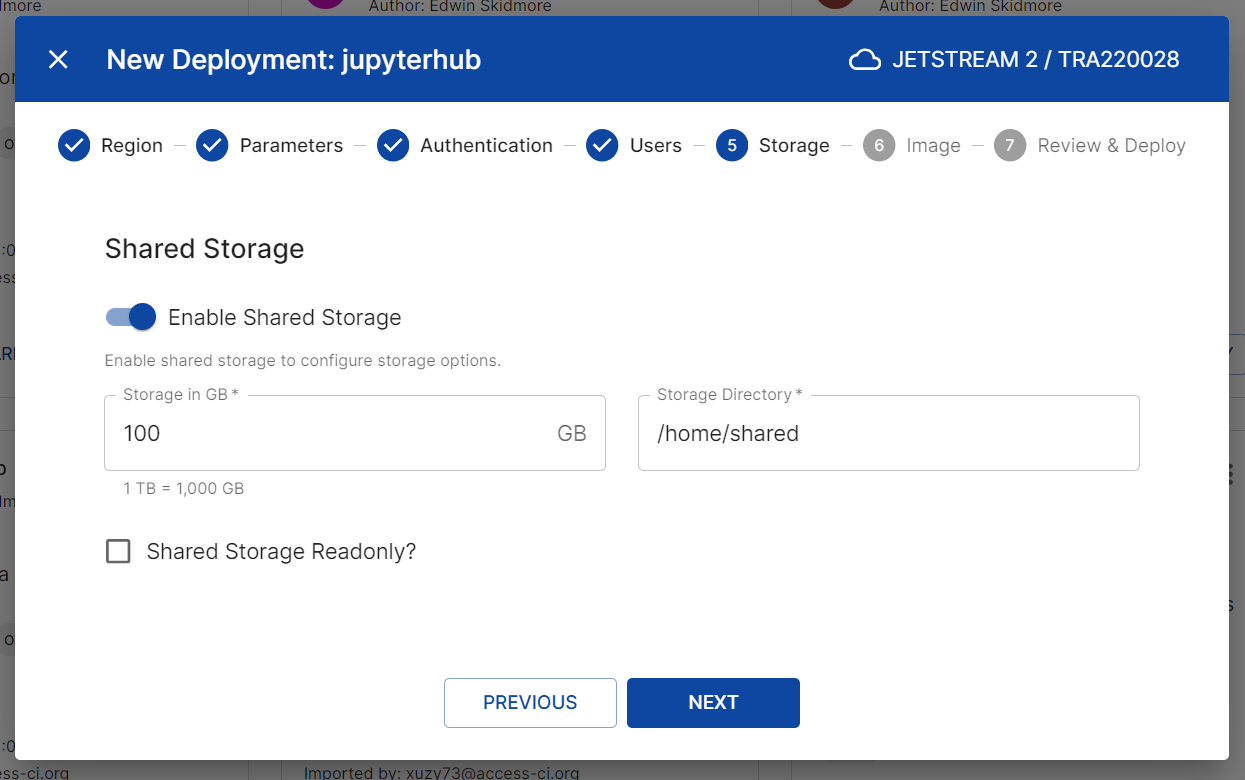
-
The Shared Storage screen will allow you to configure a mounted shared volume WITHIN the master node and within each jupyter notebook. This is useful for sharing data between users or for persisting data between sessions. This is optional, but if you enable, you can configure the following:
- Storage in GB: Size of your shared storage in GB
- Storage directory: the location of your shared storage WITHIN the jupyter notebook.
- Shared Storage Readonly: If enabled, the shared storage WITHIN the jupyter notebook will be read-only. To add data to the read-only shared storage, you can do so on the master node. If disabled, the shared storage will be read-write (default).
Note
The shared storage is using OpenStack Manila and is part of your volume quota. However, you may need to send an email to Jetstream2 support to setup a share quota to be large enough for your project, before creating a shared storage. To view your share quota, use the Openstack CLI,
openstack share quota show <project> -c gigabytes, or contact Jetstream2 support.
- Click “Next”
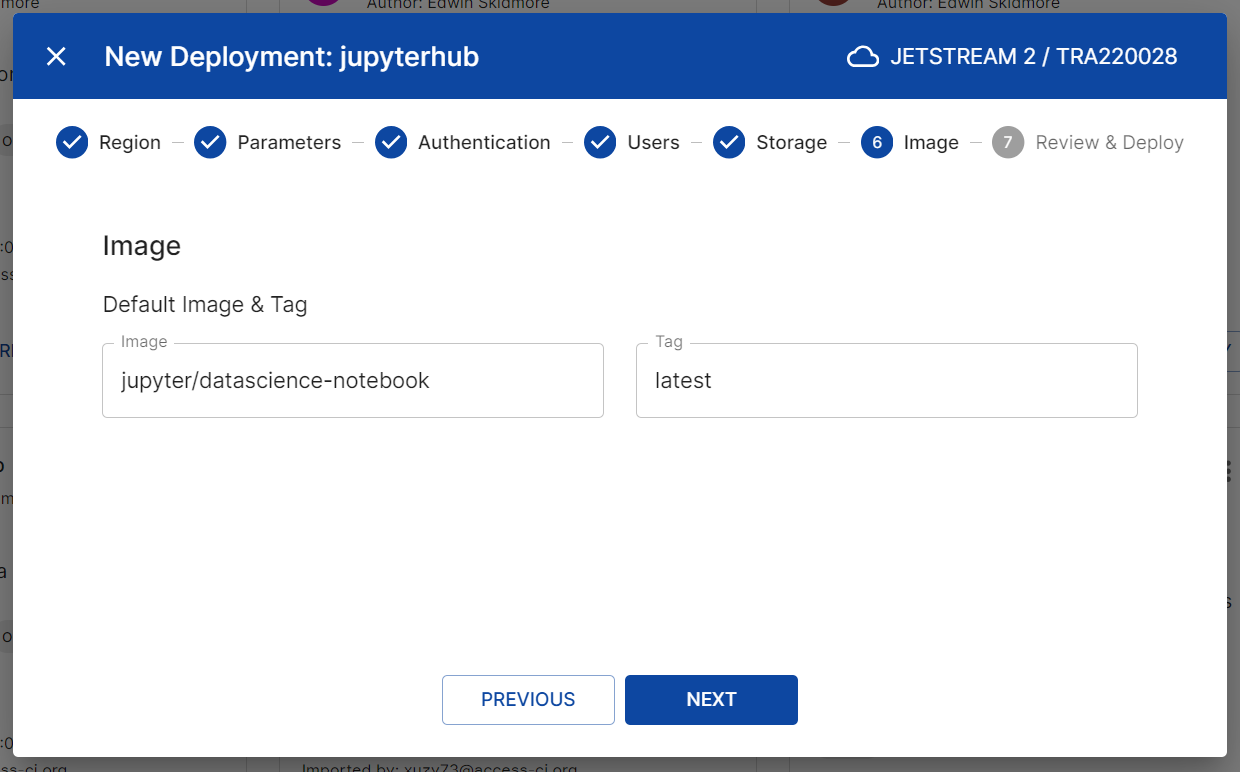
- The Image screen will allow you to select the notebook image and tag. For best results, we have had the best results from images derived from juypyter/dockerstacks.
- Image: Enter the image name, e.g.
jupyter/datascience-notebook - Tag: Enter the tag, e.g.
latest
- Image: Enter the image name, e.g.
- Click “Next”
- On the Summary screen, review the parameters and click “Submit”.
- Finally, you can click “Close” button to close the dialog or “View Deployment” button to see the status of your deployment.
Accessing your JupyterHub
When your Jupyterhub deployment is “Active”, you have a few options to access the Jupyterhub deployment. The last two options, web shell and ssh client, will allow you copy files to the share storage if you created one.
Option 1: Using the JupyterHub Interfaces
- In the Deployments list, click on your deployment
- Copy the public ip address for the master node
- Paste public ip address into browser:
http://1.2.3.4. For example, if your public ip address is1.2.3.4
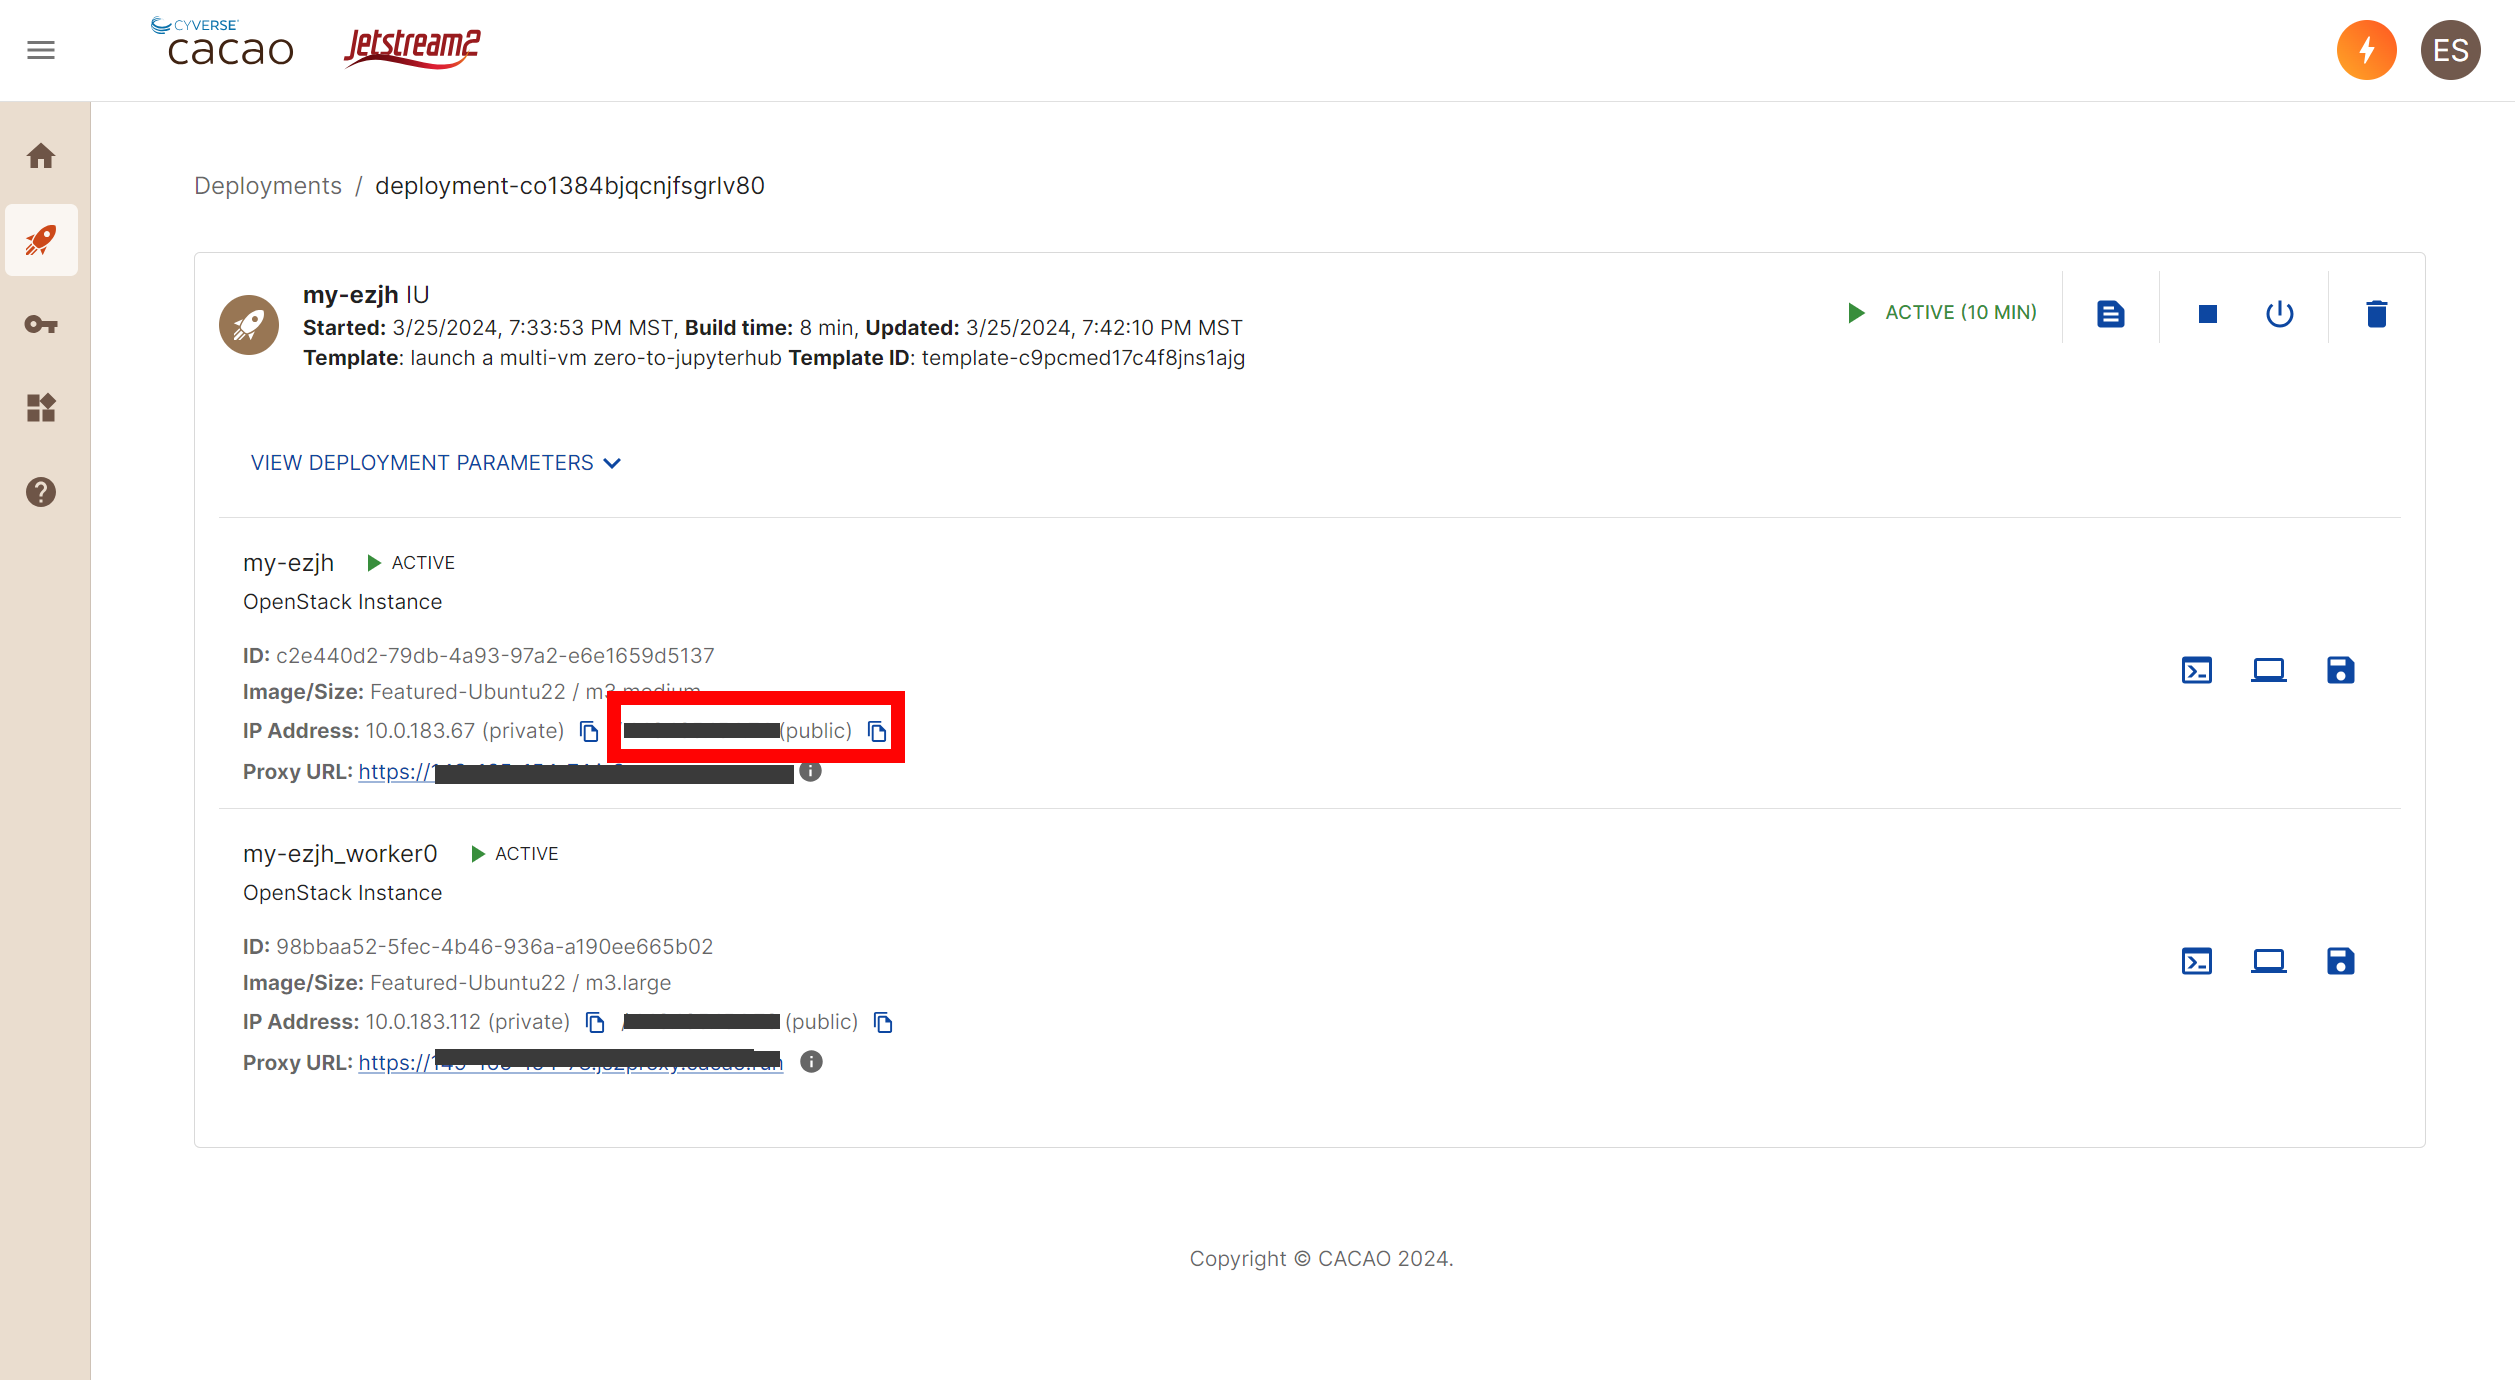
Option 2: Web Shell
- In the Deployments list, click on your deployment
- Click on the “Web Shell” button for the master node
Option 3: Using an SSH Client
- In the Deployments list, click on your deployment
- Copy the public ip address for the master node
- Using an external ssh client with access to your private key that is associated with a public key imported into CACAO, goto:
<username>@<public-ip-address>. For example, if your access ci identity (and cacao username) iswildcat@access-ci.organd the public ip is1.2.3.4, then your ssh login to the login node will bewildcat@1.2.3.4.